Left panel - Browser

Icons
In the upper left part of the dialog box, there are some icons to control the tree view display:

 Some icons appear in the TreeView to indicate that the elements contains particular information:Assembly Name in Bold Blue Font - it means it has AutoNaming
 - it means it has Attachments
 - it means it has Revisions
 - it means it has PostIt Note
 - it means it has Status Color
 - it means it is a linked file and
  the path.
Actions
 - Select in the Scene the selected TreeNodes
 - Update the TreeViews, Refresh, Expand and Collapse All
 - Select Element in BOM Grid (only active when there is a BOM grid)
 - Hide Selected Elements, Hide Unselected and Show All
 - Ghost Selected Elements, Ghost Unselected, UnGhost All
 - Zoom on Selected ItemEach click rotates the view by 90 degrees, but if the item is selected in the scene, the first click shows it in the browser and in the BOM tab
 - Set Trasparent All Other Parts
 - Suppress All Other Parts
 - Suppress/UnSuppress the Selection
 - Exchange Selection
 - Create new configuration (only active when use Suppress All Other Parts)
BOM Management
icons to manage the BOM:

 - Create BOM
 - BOM Settings
 - Open Settings Dialog…
 - Open BOM Configuration Manager…
Utils
and some utility icons:

 - Search by Properties
 The results will be shown in the Search tab (see bottom of this page)
 - Set TreeView Sort Option
 Sorts by PartName, Creation date, PartNumber or Category; the last option sets the new sorting to the SceneBrowser
 - Search and Replace Text inside elements
 - Rename Children Parts (active only when an assembly is selected)
Tabs
In the bottom edge there are four tabs:
Scene Browser
It is the same tree view as the scene

By Type
Is a treeview divided by type of elements grouped automatically into: assemblies, empty assemblies, parts, sheetmetals, 3D curves, external links, fasteners and steels; it is also possible - with the right click - to Suppress/Unsuppress all elements in the group.

Included in BOM
Shows the elements included in the BOM, or those not included or see them both (with the combobox below you can choose how to see them)

Search
This tab containing the results of the search function;
search for a multiple fields:

search for a Status filter:

or the result of Search by Properties.

Note
For how to set the search function see here .
Right panel - Properties

On the right side there are some tabs whose number changes according to what is selected in the browser on the left.
Scene
This tab shows the properties of the opened file (in the top grid), while in the bottom tab “Scene Properties” you can edit them or add new ones, if you want to always add the same properties in all scenes, see here.

BOM
In the BOM tab, you manage all the data that will be used to compile the Bill Of Materials, such as PartNumber, Description and User Name (you can also change it in the browser on the left, click on the name and click again to edit), also you can set Material Name, Color and Category, while in the bottom of the tab you manage the Custom Data.

 - Search Next Part with the same PartNumber
 - Serach Previous Part with the same PartNumber
 - Set Status Colors on the selected elements see here

 - Include or
  Exclude Element in BOM

(If the icon in BOM is disabled, also the fields PartNumber, Description and Quantity will be disabled.)
 - Set User QuantityIf it’s active, in the grid below the quantity row is activated (the item “Computed by IronCAD” disappears) and the quantity can be entered manually
Available only for Assemblies
 -
-  - Assembly Expansion in BOM
Expand or Treat as Part, for All connected instances or Only for this Assembly

Utility and Custom Data
In the left column, you can enter the Name of the CustomData, or if you click on the dropdown menu, you can choose the name from a custom list (that you can create and modify by clicking on the <New...> field) see here for set default name

While, in the right column enter the Value of the CustomData, again if you click on the drop down menu, you can choose the value from a custom list (which you can create and modify by clicking on the <New...> field), in addition there are two other special fields:
<Get From Parent>
If you select this option, the value of the current CustomData is obtained from the one with the same name from the parent assembly and set in the CustomData value of the part.<Set To Children>
When you select this option, the current CustomData value of the assembly will be set in all child items that have a CustomData with the same title as the assembly.These options only copy CustomData values. Copied values do not remain “linked” to the original selected value
the icon in the name cell
 - Deletes the CustomData field, both the name and the valuethe icon in the value cell
 - Sets and links the current value from an Excel cell
By typing Alt+d in a CustomData or Property field, the current date will be inserted.
Utility Icons

 - Set current UserName using PartNumber
 - Set current UserName using Description
 - Set current PartNumber using UserName
 - Set current Description using UserNameThese four tools also work with an active multiple selection in the browser.
 - Set UserName using CustomValueSchema
 - Set All UserNames using CustomValueSchema
 - Set CustomValueSchemaSets the field to choose to change the user name:

 - Numbering Selected Elements, read more here…
 - Import CustomData, import custom data from Excel file, CVS or Text file
 - Export CustomData, export custom data to a CVS or Excel file (all CustomData or DefaultTitles)
 - Update Excel -> Custom fields, update custom data fields linked to an Excel file, or vice versa.

Custom Data fields that are linked to Excel are yellow and there are two icons in the cell, one to view the Excel file and the other  to remove the link.
Other tabs

In the bottom area of the BOM tab, in addition to the Custom Data fields, there are also tabs for: Revision History, PostIt Note and Attachements.
And here you can add or edit all these properties very quickly.
Element
In this tab you can see the geometric data of the element such as sizebox and position, and it is also possible to change the Material Name and then calculate the volume and weight and the center of gravity (if the selection is a 3D curve, it shows the length of the curve).

Configurations
The tab shows the present configurations of the file and here you can also manage them.To manage the configurations you can also see Configurations Manager.

Search
Here you can search and manage searches for elements in the open file, you can search across multiple fields and with different conditions, you can search only for certain elements by selecting the icons in the top bar, and you can also save the search conditions to reuse them in other files.
 - Start Search
 - Clear Search TreeView
 - Clear Search Grid
 - Add Search Condition
 - Remove Search Condition
 - Save, Delete, Apply Search Condition - Search by Status Colors
 - Include/Exclude Elements in the Search
 - Search Case Sensitive

Note
The results of the search function are displayed in the Search tab on the left see here.
Bottom panel - BOM Grid

In the Bottom Side of the dialog the Bill Of Materials is shown, normally it is hidden, to show it you have to create a BOM.
Icons
Above the BOM there are some icons to control the grid:
 - Update BOM and Import from Excel

 - Export Grid BOM in txt format or in other formats:see here how to set Export BOM

 - Print Preview Grid BOM (open dialog)

 - Print Grid BOM (directly)
 - Autoresize All Columns during resizin of the dialog
 - Auto Fit all the columns of the BOM
 - Save the Template file of Columns Layout
 - Restore the Columns Layout usin Template file
 - Show Parent CustomData to Children Elements
 - Clear Parent CustomData to Children ElementsShow/Clear Assembly CustomData in Children Parts, only if you have enabled the “Inherited by Children” setting in a BOM configuration.
 - Toggle Selection ModeAllows you to select multiple grid cells, useful for copying and pasting them in other areas or in other applications such as Word, Excel…
 - Set Custom Sort

Normally to sort the grid you can click on the column name, with Set Custom Sort you can sort the grid by more than one column.

 - Set Row Filter

When the option is enabled, a new icon appears at the top of the rows, clicking on which brings up a menu for selecting a quick filter or a custom one.

 - Open the BOM in a new dialog, (is up there on the right), effectively detaching the BOM grid in a separate window; this behavior can be set as the default choice in BOM Settings -> BOM Option Grig
 - Close BOM, (is up there on the right) closes the active BOM grid.

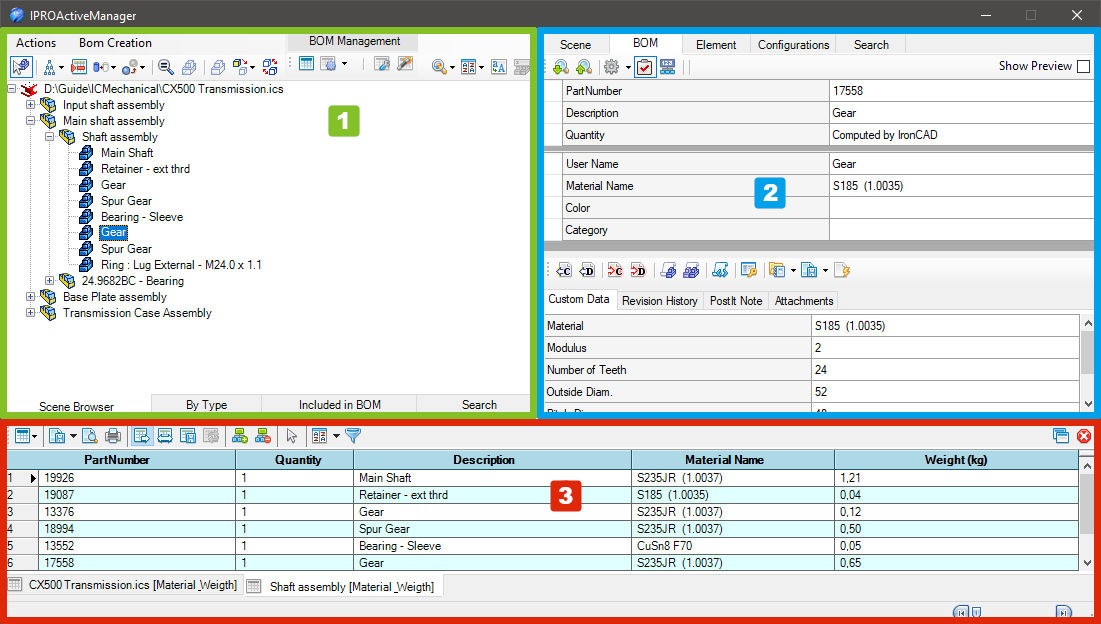
At the bottom of the BOM there are one or more BOM tabs, with the name of the selected file or assembly, and in square brackets which [BOM configuration name] was used to create it.
In the example above there are two ones, the first of the entire file and the second of the Shaft assembly only, both with the configuration [Material_Weigth].
To view the BOM you want, you need to create a configuration and set it in BOM settings to choose what to include, and how to format the different columns, etc.